If you create a project in Visual Studio 2010 Beta that implements custom code that uses the Microsoft.SharePoint.Taxonomy.dll assembly, when you try to compile the code, you'll get the following error message:
The primary reference "Microsoft.SharePoint.Taxonomy, Version=14.0.0.0, Culture=neutral, PublicKeyToken=71e9bce111e9429c, processorArchitecture=MSIL" could not be resolved because it has an indirect dependency on the framework assembly "System.Web.DataVisualization, Version=3.5.0.0, Culture=neutral, PublicKeyToken=31bf3856ad364e35" which could not be resolved in the currently targeted framework. ".NETFramework,Version=v3.5".
As the error states, a wrong version of the System.Web.DataVisualization.dll assembly is being referenced. This is actually a design time issue that occurs in Visual Studio. Otherwise at run time .NET loads the correct version of the assembly. You'll run into the same problem if you use the Microsoft.Office.Server.Search.dll and Microsoft.SharePoint.Publishing.dll assemblies.
Microsoft has posted a simple solution for this problem. All you need to do is to add a reference to the System.Web.DataVisualization.dll assembly, which is located in the following folder:
C:\Program Files (x86)\Microsoft Chart Controls\Assemblies\System.Web.DataVisualization.dll.
Happy coding!
Tuesday, December 29, 2009
A Visual Studio 2010 Beta Console Application issue in SharePoint 2010 custom code
If you create a console application in Visual Studio 2010 and try to use types such as SPSite from the SharePoint server object model (Microsoft.SharePoint.dll assembly), when you compile your project, you'll get the following error:
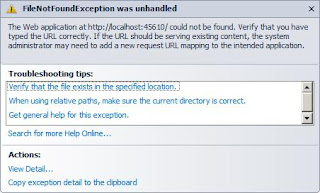

You won't get this error if you're using types such as Site from the SharePoint client object model (Microsoft.SharePoint.Client.dll assembly) in your console application.
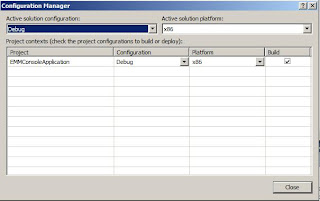
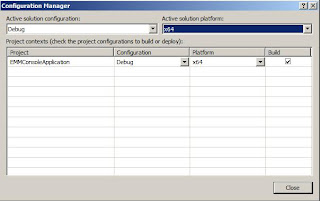
As you can see from the previous snapshot, Visual Studio 2010 complains that it couldn't find the Web application even though the Web application exists in reality. This happens because of two reasons. First, the active solution platform by default is set to x86:

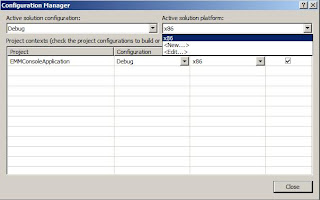
You need to change that to x64. Pretty easy to do this. Just select New from the drop down menu:

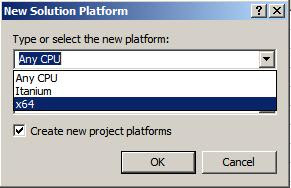
This launches the New Solution Platform dialog. Select x64 and click OK.

After you did that you should see that the right active solution platform shows up:

Second, Visual Studio 2010 by default uses the .NET Framework 4.0. You need to change that to .NET Framework 3.5. To do that, right click the project node in the solution explorer window and select Properties. You should see a drop down menu there for the target framework. Select .NET Framework 3.5 from that menu and save your changes.
Happy Coding!
Happy Coding!
Thursday, December 24, 2009
A couple of comments on features
The element contains two child elements: ElementManifests and ActivationDependencies. The ElementManifests element supports one or more ElementManifest and ElementFile elements. The ElementManifest and ElementFile elements are used to reference files that make up the feature.
The great thing a bout referencing files from the feature.xml file is that you don't need to specify them directly in the manifest.xml file. SharePoint automatically deploys these files when it deploys the feature.xml file that references them. Here is how it works. SharePoint reads the value of the L ocation attribute on the and ElementFile elements, which are nothing but the folder paths to the referenced files. SharePoint then creates the same folder structure in the root folder of the feature in the file system of every WFE server and deploys the referenced files to the respective folder.
For example, consider the following:

The above feature deploys two Web parts to SharePoint. The ElementManifest elements reference the Elements1.xml and Elements2.xml element manifest files that provision the Web parts into the Web parts gallery. The ElementFile elements reference the WebPart1.webpart and WebPart2.webpart files that contain the definitions for these two Web parts.
The only thing that you need to reference in the manifest.xml file is the feature itself. No need to reference the element manifest files that contain the Web part provisioning logic or Web part definition files:

SharePoint will read the values of the Location attributes on two ElementManifest elements and create two folders named WebPart1 and WebPart2 in the root folder of the feature on every WFE server in the server farm and deploy the Elements1.xml and Elements2.xml element manifest files into these two folders, respectively.
SharePoint will also read the values of the Location attributes on two ElementFile elements. Because the WebPart1 and WebPart2 folders are already created in the root folder of the feature, SharePoint simply deploys the WebPart1.webpart and WebPart2.webpart Web part definition files into these folders, respectively.
So far I covered the ElementManifests child element of the Feature element. Next I'll discuss the ActivationDependencies child element. This child element can contain zero or more ActivationDependency element. Each ActivationDependency element specifies a feature that has to be activated before the current feature can be activated. In other words, the activation of the current feature depends on the activation of the features referenced in the ActivationDependencies element.
Does this mean that SharePoint automatically activates the features on which the activation of the current feature depends? The answer is it depends on whether the features on which the activation of the current feature depends are hidden or not.
If the dependent features are hidden and inactive, SharePoint automatically activates them. This also means that SharePoint automatically deactivates these hidden features when the last feature that depends on them is deactivated.
However, if the dependent features are visible, SharePoint does not automatically activate them. This means that these features must be activated before an attempt is made to activate the current feature otherwise the current feature will not be activated.
The great thing a
For example, consider the following:

The above feature deploys two Web parts to SharePoint. The ElementManifest elements reference the Ele
The only thing that you need to reference in the manifest.xml file is the feature itself. No need to reference the element manifest files that contain the Web part provisioning logic or Web part definition files:

SharePoint will read the values of the Location attributes on two ElementManifest elements and create two folders named WebPart1 and WebPart2 in the root folder of the feature on every WFE server in the server farm and deploy the Elements1.xml and Elements2.xml element manifest files into these two folders, respectively.
SharePoint will also read the values of the Location attributes on two ElementFile elements. Because the WebPart1 and WebPart2 folders are already created in the root folder of the feature, SharePoint simply deploys the WebPart1.webpart and WebPart2.webpart Web part definition files into these folders, respectively.
So far I covered the ElementManifests child element of the Feature element. Next I'll discuss the ActivationDependencies child element. This child element can contain zero or more ActivationDependency element. Each ActivationDependency element specifies a feature that has to be activated before the current feature can be activated. In other words, the activation of the current feature depends on the activation of the features referenced in the ActivationDependencies element.
Does this mean that SharePoint automatically activates the features on which the activation of the current feature depends? The answer is it depends on whether the features on which the activation of the current feature depends are hidden or not.
If the dependent features are hidden and inactive, SharePoint automatically activates them. This also means that SharePoint automatically deactivates these hidden features when the last feature that depends on them is deactivated.
However, if the dependent features are visible, SharePoint does not automatically activate them. This means that these features must be activated before an attempt is made to activate the current feature otherwise the current feature will not be activated.
Thursday, December 3, 2009
SharePoint 2010 Improvements in Application Pages
One of the biggest problems with application pages in SharePoint 2007 is that they use a different master page than the rest of the pages in your site. As such, they don't follow your site branding.
SharePoint 2010 comes with new changes in application pages, which enables them to use the same master page that any other page in your site uses. Next, we'll see these changes in action so you know what changes you'll need to make in your SharePoint 2007 application pages when you decide to migrate them to SharePoint 2010 if you want your application pages use your site branding.
Launch Visual Studio 2010 and create a new Empty SharePoint Project named DemoSharePointProject. This will take you to the following screen:

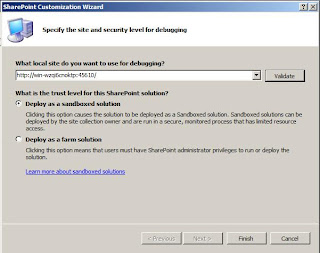
Enter the URL to the local site that you want to use for debugging. Note that Visual Studio 2010 does not support remote debugging. This means that you have to install Visual Studio 2010 on the client or server machine where you have installed SharePoint 2010. Microsoft decided that it was too much hassle and unproductive to allow developers to remotely attach to a worker process where one developer may reset the IIS interfering with another developer's work. The good news is you can now install SharePoint 2010 on a client Window 7 or Vista SP1 machine. So as a developer you don't have to install Windows Server.
Click the Validate button to ensure that you can access the site whose URL you've entered in the textbox.
In general, you have two deployment options for your SharePoint solutions. You could either deploy them as sandboxed solutions or as farm solutions. I'll discuss the differences and pluses and minuses and limitations of these two deployment options in a different post. For now, it suffices to say the farm solution is basically the same deployment option that you're used in SharePoint 2007. Select the farm solution option and click Next.
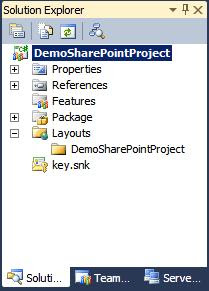
Next, right click the DemoSharePointProject node in the solution explorer, select Add, and then select "SharePoint Layouts Mapped Folder" option:

Click the Validate button to ensure that you can access the site whose URL you've entered in the textbox.
In general, you have two deployment options for your SharePoint solutions. You could either deploy them as sandboxed solutions or as farm solutions. I'll discuss the differences and pluses and minuses and limitations of these two deployment options in a different post. For now, it suffices to say the farm solution is basically the same deployment option that you're used in SharePoint 2007. Select the farm solution option and click Next.
Next, right click the DemoSharePointProject node in the solution explorer, select Add, and then select "SharePoint Layouts Mapped Folder" option:

This will automatically add a folder named Layouts with a sub folder with the same name as the project itself:

Visual Studio 2010 also makes the necessary changes in the Data Description File (DDF) and the manifest file to ensure that a folder named DemoSharePointProject is created under the standard SharePoint Layouts folder in the file system of every WFE in the server farm and that anything that you add to the DemoSharePointProject sub folder in the Visual Studio is automatically deployed to this DemoSharePointProject folder in the file system of every WFE in the server farm.
Keep in mind that you can change the name of the sub folder that Visual Studio automatically creates for you under the Layouts folder by simply clicking on the name of the sub folder:
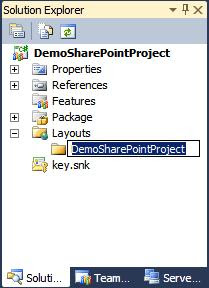
Keep in mind that you can change the name of the sub folder that Visual Studio automatically creates for you under the Layouts folder by simply clicking on the name of the sub folder:

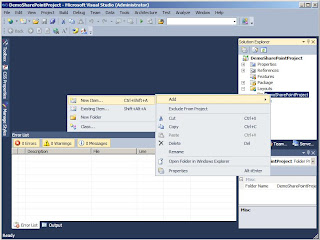
Right click the DemoSharePointProject sub folder and select the New Items option from the Add menu:

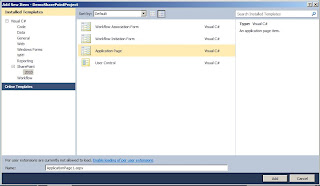
Select Application Page:

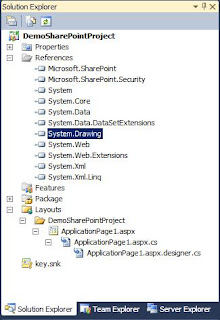
This will add both the application page and the code behind:

Now open the application page:

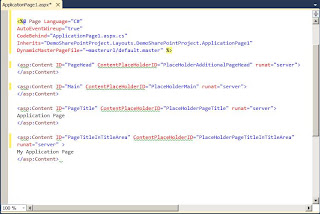
Note that the @Page directive contains the following two attributes:
- Inherits, which is set to the fully qualified name of the code behind class (ApplicationPage1)
- DynamicMasterPageFile, which is set to the token ~masteruser/default.master. This is a new attribute introduced in SharePoint 2010 Beta. The actual name of the attribute may change in the final release of SharePoint 2010.

As you can see this class inherits from LayoutsPageBase. You should make sure that when you migrate your SharePoint 2007 application pages that they inherit from LayoutsPageBase.
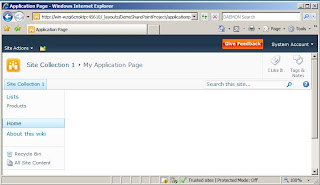
The main goal of the new DynamicMasterPageFile attribute is to have your application page to use the same master page that your other site pages use in your site. The ~masterurl\default.master token instructs SharePoint to do just that. Here is what the application page looks in SharePoint 2010.
The main goal of the new DynamicMasterPageFile attribute is to have your application page to use the same master page that your other site pages use in your site. The ~masterurl\default.master token instructs SharePoint to do just that. Here is what the application page looks in SharePoint 2010.

As you can see, the page has the same look and feel as the rest of the site.
Note that I'll be refering to this post in my future posts where we'll be discussing some other new features of SharePoint 2010.
Note that I'll be refering to this post in my future posts where we'll be discussing some other new features of SharePoint 2010.
Unique Column Constraints in SharePoint 2010
In SharePoint 2007 you couldn't enforce uniqueness on a column in a list or document library to ensure that the column would never have duplicate values, i.e., to ensure that no two list items in the list would have the same values for the column. In SharePoint 2007 the only column that supports uniqueness is the ID column. In other words, no two list items in the same list can have the same values for the ID column.
Things have changed in SharePoint 2010. You can now enforce uniqueness on the columns of the following types: Single line of text, Choice field (but not multi-choice), Number, Currency, Date/ Time, Lookup (but not multi-value), Person or Group (but not multi-value), and Title (but not in a document library)
You can enforce uniqueness on columns of the above types provided that you have enabled indexing on the column. In other words, only indexed columns support uniqueness. You cannot turn off indexing on a column as long as the uniqueness is turned on on the column. You have to turn off uniqueness before you could turn off indexing.
Also note that uniqueness is case-insensitive. For instance, let's say you have a column named Product Name in a Products list. If you've turned on uniqueness on this column, you cannot add two items with the following two values for this column: Product1 and product1. This is because these two values are considered equivalent.
Note that lookup columns also support uniqueness, but what does uniqueness means in the case of a lookup column? A uniqueness in this case means that more than one list item in the child list cannot look up to the same list item in the parent list.
Next, we'll see how we can create a unique column through SharePoint user interface and through object model.
Creating a unique column through SharePoint user interface
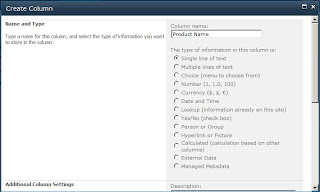
Create a custom list named Products and click the Create Column button in the ribben to launch the Create Column dialog:
Things have changed in SharePoint 2010. You can now enforce uniqueness on the columns of the following types: Single line of text, Choice field (but not multi-choice), Number, Currency, Date/ Time, Lookup (but not multi-value), Person or Group (but not multi-value), and Title (but not in a document library)
You can enforce uniqueness on columns of the above types provided that you have enabled indexing on the column. In other words, only indexed columns support uniqueness. You cannot turn off indexing on a column as long as the uniqueness is turned on on the column. You have to turn off uniqueness before you could turn off indexing.
Also note that uniqueness is case-insensitive. For instance, let's say you have a column named Product Name in a Products list. If you've turned on uniqueness on this column, you cannot add two items with the following two values for this column: Product1 and product1. This is because these two values are considered equivalent.
Note that lookup columns also support uniqueness, but what does uniqueness means in the case of a lookup column? A uniqueness in this case means that more than one list item in the child list cannot look up to the same list item in the parent list.
Next, we'll see how we can create a unique column through SharePoint user interface and through object model.
Creating a unique column through SharePoint user interface
Create a custom list named Products and click the Create Column button in the ribben to launch the Create Column dialog:

Name the new column Product Name and select the Single line of text option as its data type. Scroll down to see the Additional Column Settings section of the dialog:
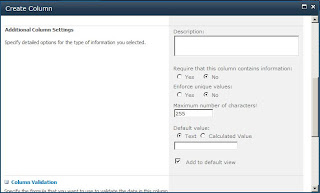

Note that this section contains a new option titled Enforce unique values, which is off by default. In other words, by default all columns (off course except for the ID column) accept duplicate values. Select Yes to enforce uniqueness on the Product Name column. Scroll down to see the Column validation section:
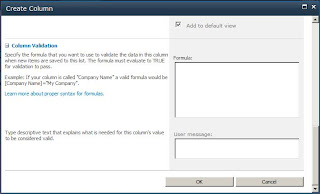

This section allows you to add validation formula to this column. When a user is entering a new value for this column or updating its value, this formula will automatically execute to validate the user input. Note that this validation is performed at the data store level not the user interface layer. This means that if you write custom code to enter a value for this column or change its current value, this formula will be automatically executed to validate your value.
As you can see, the following three features on a column bring SharePoint columns very close their database counterparts in terms of integrity constraints:
As you can see, the following three features on a column bring SharePoint columns very close their database counterparts in terms of integrity constraints:
- Require that this column contains information
- Enforce unique values
- Column validation

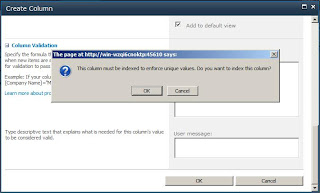
The message says that the Product Name must be indexed to enforce unique values. As discussed earlier, only indexed columns support the unique column constraints feature. Click OK.
Create a unique column through code
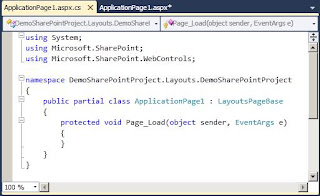
First go ahead and delete the Product Name column through SharePoint user interface because we want to add the same field through code. Following the steps discussed in one of my previous post to create an empty SharePoint project with an application page. Then use the following as the code behind for this application page:
using System;
using Microsoft.SharePoint;
using Microsoft.SharePoint.WebControls;
namespace DemoSharePointProject.Layouts.DemoSharePointProject
{
public partial class ApplicationPage1 : LayoutsPageBase
{
protected void Page_Load(object sender, EventArgs e)
{
using (SPSite site = new SPSite("http://win-wzqi6cnoktp:45610/"))
{
using (SPWeb web = site.OpenWeb())
{
web.AllowUnsafeUpdates = true;
SPList products = web.Lists["Products"];
SPFieldCollection fields = products.Fields;
fields.Add("Product Name", SPFieldType.Text, true);
SPField productName = fields["Product Name"];
productName.Indexed = true;
productName.EnforceUniqueValues = true;
productName.Update();
}
}
}
}
}
Now if you access the application page, it should add the Product Name as an indexed unique column to the Products list.
As you can see from the above code, the SPField base class supports two new boolean properties in SharePoint 2010 named Indexed and EnforceUniqueValues. As discussed earlier you have to set the Indexed property to true before you can set the EnforceUniqueValues properties to true.
Create a unique column through code
First go ahead and delete the Product Name column through SharePoint user interface because we want to add the same field through code. Following the steps discussed in one of my previous post to create an empty SharePoint project with an application page. Then use the following as the code behind for this application page:
using System;
using Microsoft.SharePoint;
using Microsoft.SharePoint.WebControls;
namespace DemoSharePointProject.Layouts.DemoSharePointProject
{
public partial class ApplicationPage1 : LayoutsPageBase
{
protected void Page_Load(object sender, EventArgs e)
{
using (SPSite site = new SPSite("http://win-wzqi6cnoktp:45610/"))
{
using (SPWeb web = site.OpenWeb())
{
web.AllowUnsafeUpdates = true;
SPList products = web.Lists["Products"];
SPFieldCollection fields = products.Fields;
fields.Add("Product Name", SPFieldType.Text, true);
SPField productName = fields["Product Name"];
productName.Indexed = true;
productName.EnforceUniqueValues = true;
productName.Update();
}
}
}
}
}
Now if you access the application page, it should add the Product Name as an indexed unique column to the Products list.
As you can see from the above code, the SPField base class supports two new boolean properties in SharePoint 2010 named Indexed and EnforceUniqueValues. As discussed earlier you have to set the Indexed property to true before you can set the EnforceUniqueValues properties to true.
Subscribe to:
Posts (Atom)

