In this post, we'll install and configure Active Directory Domain Services (AD DS). This installation consists of two main steps. We'll do the first step in this post and leave the next step to the next blog post.
For those of you who might be new to AD DS, here is a very brief description of AD DS. As the name suggests, Active Directory Domain Services is a directory. We all know what a directory does. It stores information about other things or people. A directory provides two services. On the one hand, information about things and people can be added to it. White pages are an example of these services. On the other hand, you can access this information and use it. For example, if you need an address of a person, you refer to a directory for that.
AD DS is a directory like any other directory. On the one hand, it enables authorized applications or people to add and store information about users, computers, and other resources on a network. On the other hand, it enables applications such as Exchange Server or SharePoint to access and use this information to make possible rich features such as new social networking features in SharePoint 2010.
AD DS also helps administrators to manage network resources in secured fashion. In addition, AD DS enables users to share resources and consequently facilitates collaboration.
As mentioned, many Microsoft products such as Microsoft Exchange Server and Microsoft SharePoint Server depend on Active Directory for many of their features and capabilities. For instance, Active Directory is used in the authentication process when a user attempts to access a protected SharePoint resource. I will be posting on the SharePoint 2010 features and capabilities that heavily rely on Active Directory when we're done with this series of posts that tackle the installation issues. For example, you'll see that SharePoint imports user profile information such as user name, email, user manager name, etc from Active Directory. User profiles are the backbone of the new social computing and people search features in SharePoint 2010.
Active Directory is hierarchical in nature. At the root of this hierarchy lies what is known as forest. Even though there could be more than one forest but AD hierarchies usually contain a single forest at the root of the hierarchy.
A forest contains one or more domains. A domain can contain one or more of what is known as Organizational Units (OU) where each OU itself can contain one or more OUs. This way you can create a hierarchy of OUs within a given domain. Microsoft strongly recommends to minimize the number of domains in a forest and use OUs instead.
Active Directory stores information about users, computers, and other resources on a network in a database known as AD database. Every domain contains one or more of what is known as domain controllers. Each domain controller in a domain maintains a copy of the AD database. This ensures that there is no single point of failure in the domain. If a domain controller goes down, the domain will continue functioning properly because other domain controllers have the same copy of the AD database.
Having multiple copies of the AD database seems to introduce the following problem. What if the content of one of these copies changes? For example, what if a user changes his password, which is stored in a copy of the AD database maintained by one of these domain controllers. How would other domain controllers would know about this change?
This is where replication comes into play. When a change occurs in the AD database copy of one domain controller, that domain controller notifies other domain controllers in the domain. Note that the domain controller does not push the changes onto other domain controllers. It simply notifies them. The other domain controllers then ask the first domain controller for the changes. In other words, the replication uses a pull model instead of a push model.
As a domain grows and more information is stored in the AD database, the replication will become more expensive. When a domain becomes too big, you can introduce new domains. Because replication is scoped to a domain, introducing new domains decreases the size of AD databases maintained by domain controllers and improves the replication performance.
As mentioned, Microsoft strongly recommends that you expand your AD hierarchy by introducing new OUs instead of domains. We just learned one reason why you would want to add new domains. There are three reasons for introducing new OUs:
- You want to introduce different Active Directory policies and security rights. For instance, installing specific software only on computers in specific division of your company such as Marketing.
- You want to create a hierarchical structure that matches the structure of your organization. This normally takes two forms. In one form you create new OUs to represent different geographical divisions in your organization, e.g. European branch. In another form, you create new OUs to represent structural divisions within your organization, e.g. Marketing. To have a consistent AD hierarchy you should choose one form or the other. You shouldn't mix them.
- You want to delegate certain administrative responsibilities to others. You create an OU and delegate the administrative responsibilities of this OU to another person.
If these AD concepts sound a bit alien to you, don't worry about it. You'll get to see these concepts in action when we're done with the installation of AD DS.
Now it's time to get our feet wet and start doing the first part of the installation of AD DS. Select Server Manager from the Start menu:
This launches Server Manager. Select the Roles node from the left pane to view the list of installed server roles in the right pane.
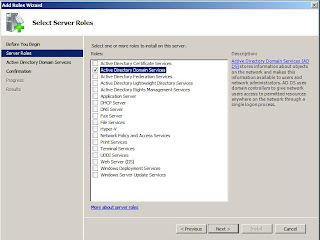
Currently no roles have been installed. We're going to install the AD DS server role. As you can see, AD DS is considered a server role. A server role defines a set of tasks that the server performs. In the case of AD DS, these are directory-related tasks. Click Add Roles link in the right pane. This takes you to the following screen:

Currently no roles have been installed. We're going to install the AD DS server role. As you can see, AD DS is considered a server role. A server role defines a set of tasks that the server performs. In the case of AD DS, these are directory-related tasks. Click Add Roles link in the right pane. This takes you to the following screen:

This screen displays the list of all server roles to choose from. Select the Active Directory Domain Services server role and click Next:


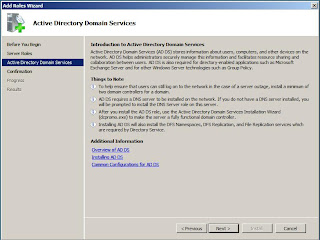
This screen contains some information about AD DS and provides links to more information about this server role. I encourage you to follow these links. They provide lot of useful information. You don't have to read all that now though. Click Next:


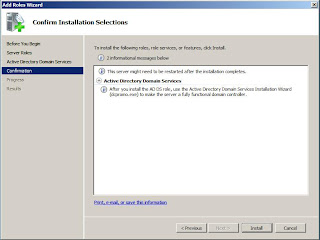
Because adding server roles are such invasive operations, the system always shows screen like the one in the above when you try to install a new server role to confirm that you indeed want to install the specified server roles. This also gives you one last chance to make sure you did not accidentally select other roles to install.
Make sure you're only installing AD DS server role. You should not install any other server roles. You may be wondering how about the Web Server role. Why aren't we installing this role? This server will be a Web server after all. Here is the answer to this question. As you'll see later, when you install SharePoint 2010 Beta, as part of the installation of the prerequisites, the installation process also installs and configures the Web server role. You should let the SharePoint installation process does the installation and configuration of the Web server role. Do not install the Web server role!
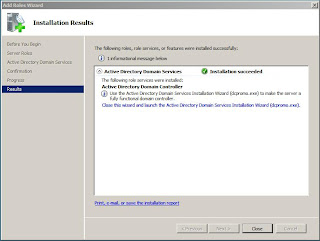
Click Install to install the AD DS server role and wait until you get the following screen:

Note that this screen contains the following link:
Close this wizard and launch the Active Directory Domain Services Installation Wizard (dcpromo.exe).
For those of you who are new to Active Directory and may not know what this is all about, here is a brief explanation. In the above I kept saying we're installing AD DS server role. As mentioned, the installation process actually consists of two steps. The first step is to install the installation files that are required to install and configure the AD DS server role on the server. This is what we have done so far. In other words, what we have done so far put all the required bits on the server but the AD DS server role itself has not been installed and configured yet. Only the bits required for installing this role are put in place. The second step is to run the AD DS Installation Wizard, which uses these installation files and bits to actually install and configure the AD DS server role on the server. This is what we're going to do in the next post.


No comments:
Post a Comment