Saturday, November 28, 2009

SharePoint 2010 Beta Installation (Part 10): Installing SQL Server 2008 Cumulative Update Package 2 (CU2) 64 bit

This is the tenth post in a series of posts where I'm using screen shots to walk you through the steps to install SharePoint 2010 and all its prerequisites such as OS, SQL Server, service packs, cumulative update packages, etc.

In this post, we'll install the SQL Server 2008 Cumulative Update Package 2 (CU2), which can be downloaded from the following URL:

http://support.microsoft.com/kb/970315

Getting CU2 requires you to provide an email address to Microsoft. Make sure the settings on your browser is correct so you get 64 bit version of CU2. You’ll get an email from Microsoft that contains two links with two passwords. Click the second link first to download the first hotfix. After you download it, execute it. This will try to unzip the file and will pop up the following asking for the password that you got from Microsoft:


Enter the password and click OK. After unzipping is done, use the Windows Explorer and navigate to the folder where the hotfix is unzipped and click the hotfix to execute it:


You should get no failures, warning, or skipped items. Click Next:


Accept the license terms and click Next:


Make sure the MSSQLSERVER option is checked. This is the default SQL Server instance that we installed in a couple of posts ago. In other words, we're going to apply the hotfix to this instance to update it:


Click Next


This screen gives you the last chance to ensure that the right features are updated with this hotfix. Make sure this includes the default SQL Server instance and click Update to update the instance with the changes in this hotfix:


This screen confirms that the hotfix updated the default SQL Server instance. Click Next:


Click Close. You're now done with the installation of the first hotfix. Do the same thing with the first link in the email that you got from Microsoft and follow the same steps to install the other hotfix.

We're now done with the installation of the prerequisites for SharePoint 2010 Beta. In the next post, we'll install SharePoint 2010 Beta.


SharePoint 2010 Beta Installation (Part 9): Installing SQL Server 2008 SP1 (64 bit)

This is the ninth post in a series of posts where I'm using screen shots to walk you through the steps to install SharePoint 2010 and all its prerequisites such as OS, SQL Server, service packs, cumulative update packages, etc.

In the previous post, we installed SQL Server 2008 (64 bit). In this post we'll install SQL Server 2008 SP1, which can be downloaded from the following URL:

http://www.microsoft.com/downloads/details.aspx?familyid=66AB3DBB-BF3E-4F46-9559-CCC6A4F9DC19&displaylang=en

Click the above link. This will take you to the following page:


Click the Download button for 64 bit version to down and install SP1:


You should get no failures, warnings, or skipped items. Click Next:


Accept the license terms and click Next:


Make sure the MSSQLSERVER is selected. Recall that this is the name of the SQL Server instance that we installed in the previous post. In other words, we're applying SP1 to this SQL Server instance. Click Next:


Click Next:


This screen gives you one more last chance to confirm the list of features being updated by SP1. In our case this list includes the default SQL Server instance. Click Update to update the instance with SP1:


Click Next:


Click Close. You're now done with the installation of SQL Server 2008 SP1. In the next post, we'll install the SQL Server 2008 Cumulative Update Package 2 (CU2).

SharePoint 2010 Beta Installation (Part 8): Installing SQL Server 2008 (64 bit)

This is the eighth post in a series of posts where I'm using screen shots to walk you through the steps to install SharePoint 2010 and all its prerequisites such as OS, SQL Server, service packs, cumulative update packages, etc.

In this post, we're going to install SQL Server 2008 (64 bit). Make sure you’re connected to the Internet. Pop in the SQL Server 2008 with SP1 DVD. If you only have the ISO file, you can install the DAEMON Tools Lite d(http://www.daemon-tools.cc/eng/downloads) to emulate DVD. As soon as you pop in the DVD and start installing SQL Server, the following message pops up:


It's informing you that it needs to download and install the .NET Framework. Click OK. This will take you to the following screen:


Accept the license agreement and click Install. This will download and install the .NET Framework:


Click Exit. This will take you to the following screen:


Click the Installation link on the left panel:
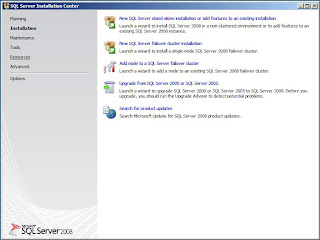


Click the "New SQL Server stand-alone installation or add features to an existing installation" link:
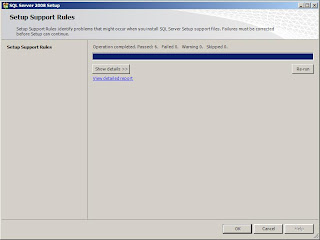


The Setup Support Rules runs to identify problems that might occur when you install the SQL Server Setup support files. There shouldn't be any failures, warning, or skipped items. Click OK. This will take you to the following screen:


Enter the product key and click Next:


Accept the license terms and click Next:
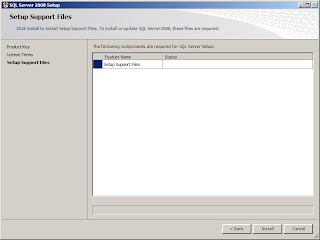


Click Install to install the Setup Support files. These files are needed to install or update SQL Server 2008:


You got two warnings. If you click on the Warning link for the first warning you'll get:
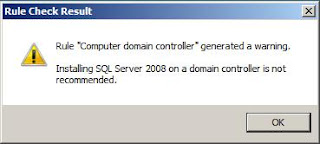


As you can see, installing SQL Server 2008 on a domain controller is not recommended. Recall that the AD DS Installation Wizard made the current server a domain controller. This is OK in our scenario so you can safely ignore this warning. However, in a production environment you should not install SQL Server on a domain controller.

If you click on the Warning link for the second warning you'll get:
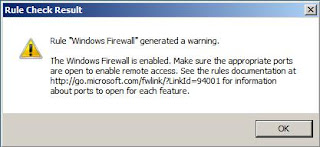


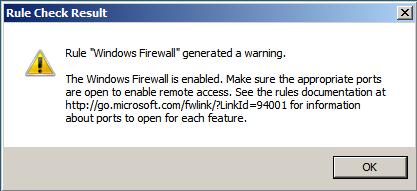
When you install Windows Server 2008, the Windows Firewall is enabled by default. This is warning you that other applications will not be able to remotely access this SQL Server instance until you open the appropriate ports. First you need to find out which ports those other applications need to use. Then you need to select Start > Administrator Tools > Windows Firewall with advanced security to launch:
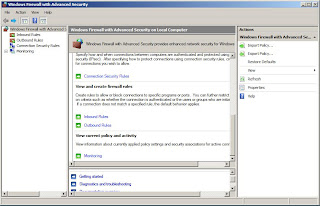


Click Inbound Rules to add rules for those applications.

In our case we can safely ignore this warning as well. So click Next:


Select the items shown in the above figure and click Next to install them:
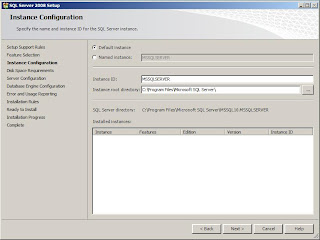


Select Default instance option. By default the SQL Server instance is named MSSQLSERVER as shown in the Instance ID text field in the above figure. You can use a different name if you wish as long as the name is unique, i.e. no other instance has the same name. You can also choose a root directory for this SQL Server instance. Whatever root directory you choose, the installation creates a folder named MSSQL10.SqlServerInstanceName under this root folder.

Use the default values for the Instance ID and Instance root directory and click Next:


The above dialog specifies the disk space requirements for this SQL Server instance. Click Next:
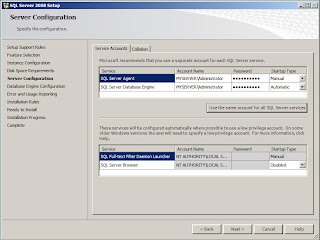


You need to specify the configuration for this SQL Server instance. You need to specify an account for the SQL Server Agent and another account for SQL Server Database Engine. It is recommended that you use two separate accounts for these two services. To keep things simple, we will use MyServer\Administrator account for both of these services.

We're using the same MyServer\Administrator account everywhere in SQL Server and SharePoint 2010 to keep our discussions simple and focused. In real life, you should create different AD accounts with different permissions for different roles in SQL Server and SharePoint 2010.

Click “Use the same account for all SQL Server services” button:


Click Browse:


Enter myserver\administrator and click Check Names. Then click OK:


Enter the password for this account and click OK:
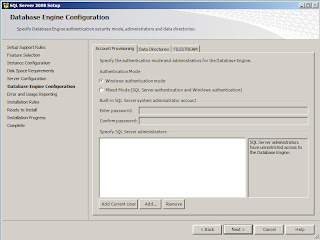


Use the specified default accounts for the SQL Full=text Filter Daemon Launcher and SQL Server Browser accounts and click Next:
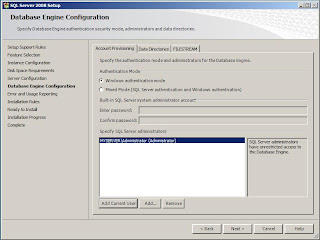


Select Windows authentication mode for the Database Engine and click Add Current User button to add current users as the SQL Server administrator. I’m assuming you logged in as myserver\administrator.


Make your selections and click Next:
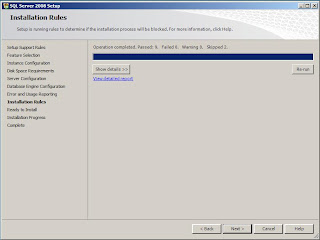


You should get no failures, no warning, but two skipped items. If you click View detailed report, you get:


As you can see the two skipped items are the two warnings that we decided to skip earlier. So we're OK. Click Next:


Click Install to start the installation:


Click Next:


Click Close. You're now done with the installation of SQL Server 2008. In the next post, we'll install the SQL Server 2008 SP1.

SharePoint 2010 Beta Installation (Part 7): Running Active Directory Domain Services Installation Wizard

This is the seventh post in a series of posts where I'm using screen shots to walk you through the steps to install SharePoint 2010 and all its prerequisites such as OS, SQL Server, service packs, cumulative update packages, etc.

In the previous post, we put in place the bits required to install the AD DS server role. In this post, we will run the AD DS Installation Wizard to install and configure the AD DS server role. To do so, you can either click the link shown in the last screen in the previous post or use Run from Start menu to execute dcpromo.exe. Either of these methods will lauch the AD DS Installation Wizard:


As this screen says, when you run the AD DS Installation Wizard on a server, it does two things:
  • Installs the AD DS server role on the server
  • Turns the server into a domain controller
We discussed the role of domain controllers in the previous post. Click the Next button on the previous screen. This takes you to the following screen with a long FYI for you:


It's a rather a long read but it boils down to this. Windows Server 2008 uses a stronger cryptography algorithms to secure access to domain controllers. Needless to say that those applications that do not support this more secure approach may fail. This is just for your FYI. Obviously this is no concern in our current deployment scenario and we should be fine. Click Next. This takes you to the following screen:


This screen gives you two options:
  • Create a new domain in a new forest. Use this option if you're creating a new forest. This covers two scenarios. One scenario is when you're installing Active Directory for the first time in your environment where you have no other forests, which is exactly the scenario we're dealing with in our current installation of Active Directory. The second scenario is when you already have an Active Directory with one or more forest and you're trying to create a new forest. This is rare though.
  • The second option is indeed two options canned as one option. The first option allows you to add a new domain controller to an existing domain. In other words, you're not creating a new domain. You're just adding a new domain controller. The second option allows you to create a new domain in the existing forest. This option automatically makes the server the domain controller in the new domain.
Keep in mind regardless of which option you choose, running the AD DS Installation Wizard on a server always turns that server into a domain controller.

Now back to our installation process. Select the "Create a new domain in a new forest" option from the previous screen and click Next:


Enter a name for the new domain such as myserver.local. Note that if you enter a single label as the domain name and hit Next, you'll get the following warning message:


Domain names should be unique consisting of labels separated by periods (.). Enter MyServer.Local (any other period-separated labels) as the domain name in the screen before the previous screen and click Next. This takes you to the following screen:


This is where you set your new forest's functional level. The "Forest functional level" menu contains three functional level options. First is Windows 2000, which is selected by default. This forest functional level limits the forest's functional level to only those AD DS features that are available in Windows 2000 servers. This means that the more advanced AD DS features that are supported in later versions of Windows Servers (such as Windows Server 2008) will not be available to those domain controllers running on those later versions of Windows Server. Second menu option is Windows 2003:


As you may have guessed it already, the Windows Server 2003 functional level limits the functional level of your new forest to AD DS features available in Windows Server 2003. This also means that you cannot add domain controllers running on Windows 2000. You're limited to domain controllers running on Windows Server 2003 or higher.

The third forest functional level option is Windows Server 2008:


Needless to say this will not allow you to add domain controllers running on the previous versions of Windows Server such as Windows Server 2003 or Windows 2000. However, it enables your forest to take advantage of all new AD DS features in Windows Server 2008.

Select the Windows Server 2008 option and click Next. This takes you to the following screen:


This screen gives you three additional domain controller options. We call them domain controller options because as mentioned earlier when you run the AD DS Installation Wizard on a server it automatically turns the server into a domain controller. You have three option:

  • DNS server
  • Global catalog
  • Read only domain controller (RODC)
We all know what a DNS server role is. It is the server role that resolves names into IP addresses. Active Directory needs the DNS to resolve resource names into IP addresses. Therefore, you have to either already have a DNS server on the network or choose to install one here. Recall that we did not manually install the DNS server role. We only installed the AD DS server role. Therefore, we have to let the AD DS Installation Wizard install the DNS server role for us. So we have to select the DNS server option on the last screen. How about the other two options?

As discussed earlier, each domain may contain more than one domain controller. The domain controllers in a given domain only maintain information about resources in that domain in their copies of the AD database. This keeps the size of these AD database copies small and replication manageable. Imagine how big the size of these AD database copies would be and how expensive these replications would be if these AD database copies were to include information about all resources in the forest, which could consist of numerous domains.

However, this introduces a problem. This seems to create silos of domains where there is no central repository where you could find information about resources in other domains. This is where the concept of global catalog server come into play. Specific domain controllers in a forest are set up as global catalog servers. These servers maintain the global catalog database, which contains brief information about all resources in the forest. Those that need more detailed information about a resource can refer to the respective domain. In Active Directory the first domain controller in a forest is automatically turned into a global catalog server, which will maintain the global catalog database. That is why the global catalog option is automatically selected and grayed out in the previous screen. In other word, the AD DS Installation Wizard will turn this server into a global catalog server you like it or not.

How about the third option, i.e. Read only domain Controller (RODC)? What is a RODC anyway? This is a new type of domain controller that Microsoft introduced in Windows Server 2008. This addresses scenarios such as the following two important scenarios:
  • Imagine a branch office in your organization has a very poor network bandwidth. Authenticating users in this branch office against a domain controller over a WAN can degrade performance dramatically for these users. You may say why don't we just add a new domain controller to the network of this branch office. This would work if the branch office has the adequate physical security in place to maintain a writable domain controller. What if these branch offices don't have such physical security infrastructure in place? This is where Read Only Domain Controllers (RODC) come into play. These branch offices can host read only domain controllers in their network to speed up their work without compromising the security of the AD database because the database is read only.
  • Imagine application servers that must be hosted on domain controllers for some reason or another. For example, it could be that the domain controller is the only server available. Now hosting application servers on the domain controllers introduces security risk because the owners of these applications need to directly access and log onto these servers. This is where Read Only Domain Controllers (RODC) can solve the problem. In other words, you host your application servers on read only domain controllers where AD databases are read only and cannot be compromised.
Note the "Read only domain controller (RODC)" option is unchecked and grayed out on the previous screen. This is because the first domain controller in a forest must be a global catalog server and cannot be a read only domain controller.

Now back to the installation of AD DC. Select the DNS server option and click the Next button on the previous screen. This will pop up the following dialog:


This is telling you that your laptop has dynamically assigned IP address and asking you to assign static IP address to your network adapter for reliable DNS operation. These dynamic IP addresses are normally assigned by your ISP and can change every time. If you have more than one computer in your network accessing the same DNS and if the IP address of that DNS constantly changes the DNS cannot operate reliably in your network. Off course this is not an issue in our case where we have only one computer in our network. So we could safely ignore this message.

However, here is how you can assign static IP address to your laptop, which happens to host the DNS server as well. Go to the Network and Sharing Center. Click Manage network connections under Tasks heading to go to the Network Connections. Right click the network connection that you want to configure and select Properties to launch the Local Area Connection Properties dialog:


Select the Internet Protocol Version 4 and click Properties:


Select Use the following IP address option and enter the IP address that you got from your system administration for your laptop. Select the Use the following DNS server address option and enter the IP address of the DNS server in your network.

Now back to the installation of AD DS. In the last installation screen, click the "Yes the computer will use a dynamically assigned IP address" option. The AD DS Installation Wizard will pop up the following message:


This message is basically warning you that the AD DS Installation Wizard could not find a parent zone. This is so because we are creating a new forest, which has its own DNS server. This message is saying that if you need to integrate this DNS server into your existing organizational DNS server infrastructure you have to do the configuration manually because the current installation has no access to this infrastructure. This is fine with us so we can safely ignore this warning. Click Yes to continue the installation. This takes to the following screen:


As discussed earlier, each domain controller maintains a copy of the AD database and respective log files and SYSVOL. This is where you specify the folders, which will contain the domain controller's copy of the AD database, log files, and SYSVOL.

Keep the default values for these folders and click Next:


You can restart a domain controller in a mode known as Directory Services Restore Mode. When you restart a domain controller in this mode, it takes the domain controller offline where the domain controller no longer function as a domain controller. This screen allows you to specify the password for the Directory Services Restore Mode Administrator account, which is obviously different from Domain Controller Administrator account. Enter a password and click Next:


This screen allows you to review the selections you've made before the actual installation starts. Click Next:


Wait until the installation completes and you get the following screen:


Click Finish. This will take you to the following screen:


You need to restart your computer to complete the installation. Click Restart Now to complete the installation.

The installation also promotes local Windows accounts on the domain controller into AD accounts. You can see this by selecting Start > Administrator Tools > Active Directory User and Computers to launch the Active Directory Users and Computers where you can manage resources in your domain:


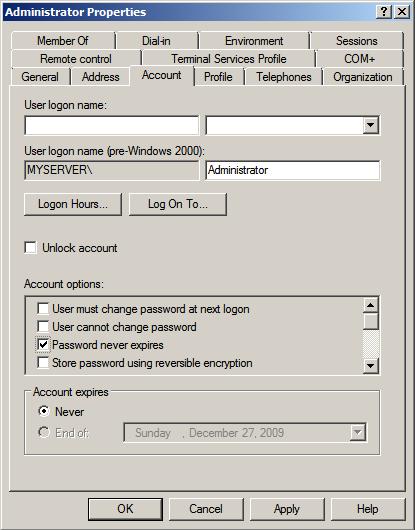
As you can see, the Administrator account, which used to be a local Windows account, has been promoted to an AD account. Because we want to use this account later in our SharePoint installation process, let's go ahead and make sure this account's password never expires. Double click Administrator in the previous screen to launch Administrator Properties. Switch to the Account tab and the "Password never expires" option and click OK.


In the next post, we'll install SQL Server 2008.